Prepping for an earthquake (Part 5): The anchor point
The engineer who inspects earthquake damage told the homeowner the number that decides everything: twelve inches. That was how far his house had slid on its foundation. Not enough to collapse, not enough to even crack the stucco visibly. But twelve inches severed the gas line, sheared every sewer connection under the floor, and turned a repairable house into a teardown. The building stood. The connection between the building and the ground did not, and nobody had ever looked at it.
In a major earthquake, the ground moves horizontally. Your house, thanks to inertia, wants to stay put. If the two aren’t securely connected, the result is catastrophic physics: the foundation moves left, the house stays right, and the structure slides off its concrete base.
Caution: The “Total Loss” Scenario. A house that slides just 12 inches off its foundation usually cannot be jacked back up. Gas lines sever, sewer pipes shatter, and the structural integrity is ruined. It often becomes a total teardown. Structural retrofitting (bolting and bracing) is the single most effective financial investment you can make in seismic country. It costs a fraction of the home’s value, but it ensures that when the shaking stops, your biggest asset is still standing squarely on its feet. This is Part 5 of the earthquake series.
Disclaimer: The information provided in this article is for general informational and educational purposes only. It is not intended as, and should not be considered, professional or architectural advice. Always consult a structural engineer for specific guidance on your property.
The Readiness Audit
Do you know what your house is sitting on?
- Green: Your home was built after 1985 (modern seismic codes), OR you have inspected the crawlspace and confirmed anchor bolts with square washers are present every 4-6 feet.
- Yellow: Your house is pre-1980, and you assume it’s safe because “it survived the last one.” (Cumulative damage weakens structures over time).
- Red: You have a “Post and Pier” foundation or unreinforced masonry, and you have never had a structural engineer look at it.
If you are Yellow or Red, execute Phase 1.
Phase 1: The Crawlspace Diagnosis (The Inspection)
Goal: Identify the two fatal flaws: the slide and the topple.
Put on coveralls, grab a bright light, and go into the crawlspace (or basement). You are looking for two things where the wood meets the concrete.
1. The Sill Plate (The Slide Risk)
- What to look for: look at the “mud sill” (the horizontal piece of wood resting directly on the concrete foundation).
- The test: do you see the heads of steel bolts sticking out of the wood with washers and nuts?
- The danger: if you see only wood resting on concrete, gravity is the only thing holding your house down. Vertical shaking will bounce the house up, horizontal shaking will slide it off.
2. The Cripple Wall (The Topple Risk)
- What to look for: the short, stubby wall (usually 2-4 feet high) connecting the foundation to the floor of the house.
- The test: is it just bare 2x4 studs (looks like a skeleton)?
- The danger: unreinforced cripple walls are the weakest link. Under lateral stress, they collapse sideways (like a cardboard box folding flat), crushing the crawlspace and dropping the house.
The Takeaway: The crawlspace visit answers two questions: are the bolts in the sill, and is the cripple wall a skeleton? The first decides the slide, the second decides the topple.
Phase 2: The Cure (Bolting and Bracing)
Goal: Connect the wood to the concrete and stiffen the walls.
Note: While a handy homeowner can do this, hiring a licensed retrofitting contractor is often recommended to ensure code compliance.
1. Foundation Bolting
- The fix: you must install anchor bolts or universal foundation plates.
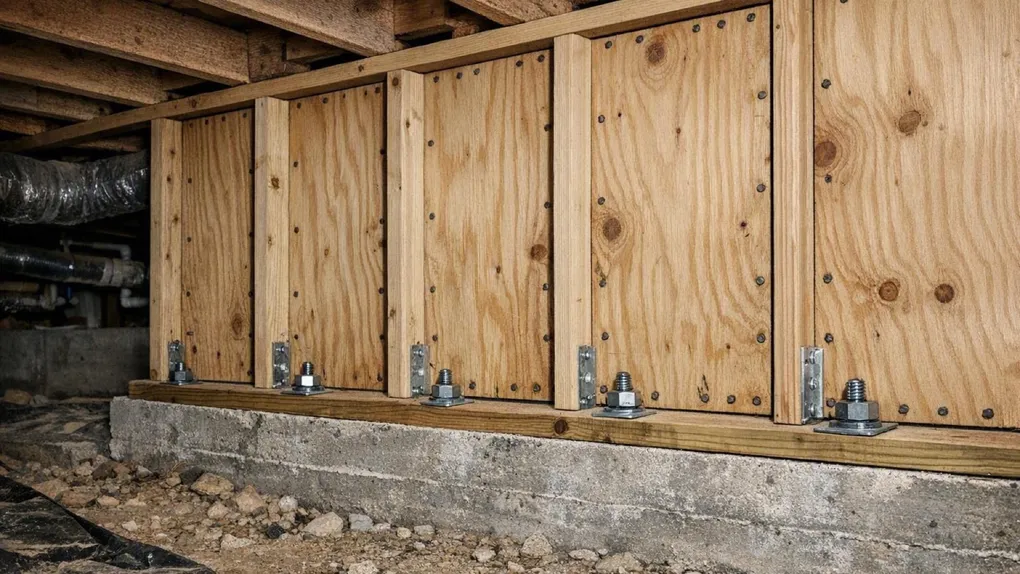
- The hardware: modern code requires heavy-duty expansion wedge anchors drilled deep into the concrete, topped with a 3-inch square plate washer.
- Why the square washer? Round washers are too small, in an earthquake, the bolt head can tear right through the wood. The large square washer clamps the wood down securely.
2. Shear Walling (Bracing)
- The fix: you must turn those bare stud “cripple walls” into rigid panels.
- The method: nail sheets of structural-grade plywood or OSB to the studs.
- The physics: this creates a “shear wall.” It prevents the studs from tipping over (racking) and transfers the earthquake’s energy harmlessly into the foundation.
The Takeaway: Bolts with square washers stop the slide, plywood on the cripple wall stops the topple, and together they are the cheapest insurance the house will ever get.
Phase 3: The Special Cases (Post & Pier / Masonry)
Goal: Identify non-standard threats.
1. Post and Pier Foundations
- The look: your house sits on individual concrete blocks or wood posts, rather than a continuous concrete perimeter.
- The risk: these act like stilts. They tip over easily.
- The fix: they require extensive cross-bracing and usually need a continuous concrete footing poured to tie them together.
2. Unreinforced Masonry (Brick/Chimneys)
- The risk: bricks are heavy and brittle. They do not flex, they crumble.
- The chimney: if you have a tall brick chimney, it can snap off and fall through the roof.
- The fix: steel strapping can secure the chimney to the roof joists to prevent it from pulling away, but often the safest move is removing the heavy masonry above the roofline and replacing it with a lighter metal flue facade.
The Takeaway: Stilts need cross-bracing and footings, and brick chimneys are roof-snapping liabilities that strapping can only partially tame.
The Essential Kit Checklist
- The inspection gear: disposable coveralls, N95 mask (dust/mold), and a high-lumen headlamp.
- The documentation: take photos of the sill plate and cripple walls to share with a contractor.
- The contractor: get quotes from at least two licensed seismic retrofitting specialists.
- The permit: verify the retrofit is permitted and inspected to code.
Scenario Planner (Contingencies)
“The quotes came back higher than expected.” The trap: shelving the retrofit because it is not urgent today. The fix: the phased retrofit, do the bolting first (it addresses the total-loss slide risk), then schedule the cripple-wall bracing as the next year’s project. Partial reinforcement beats none, and most contractors will phase the work.
“My house is post and pier and nobody will retrofit it.” The trap: assuming it is uninsurable and unfixable. The fix: the engineer consult, a licensed structural engineer can design cross-bracing and footing plans that general contractors will not quote, and some jurisdictions offer retrofit grant programs for exactly these houses.
Next Steps
- Visit the crawlspace this weekend. Coveralls, headlamp, phone camera. Two photos: the sill plate and the cripple wall. That is the whole diagnosis.
- Get two retrofit quotes if the bolts are missing. A 12-inch slide is a teardown, and the quotes are priced against that outcome.
- Read Part 6: After the quake next, because a retrofitted house still has to survive the aftershocks, the jammed networks, and the re-entry decision.
Originally adapted from public FEMA and USGS seismic-retrofit guidance (public domain).