Prepping for an earthquake (Part 4): The kill switch
The history books record the 1906 San Francisco earthquake as the great destroyer, but the fire chief’s report told a different story. The shaking lasted under a minute. The fires burned for four days, fed by broken gas lines, and unstoppable because broken water mains had drained the hydrants. The city did not die in the earthquake. It died in the hour after it, when nobody had shut the fuel off. The same script runs in every modern quake, and the role of the villain is played by three valves in your house.
In the Great San Francisco Earthquake of 1906, the tremor didn’t destroy the city - the fire did. Broken gas lines ignited, and broken water mains prevented firefighters from stopping the spread. In modern quakes, post-quake fires remain the single biggest threat to property and life.
Caution: The “Secondary Disaster.” You survived the shaking, but your house is now a ticking time bomb. Leaking gas, sparking wires, and gushing water pipes can destroy what the earthquake didn’t. You are the facility manager of your home. By knowing exactly where your utility mains are and having the right tools attached directly to them, you can sever the fuel source for fires and preserve gallons of drinkable water for your family. This is Part 4 of the earthquake series.
Disclaimer: The information provided in this article is for general informational and educational purposes only. It is not intended as, and should not be considered, professional or emergency-response advice.
The Readiness Audit
If I shouted “Turn off the gas!” right now, how long would it take you?
- Green: You have a non-sparking wrench zip-tied to your gas meter. You and your family know exactly where the main water valve is.
- Yellow: You know where the meter is, but you’d have to go dig through the tool chest to find a wrench that fits.
- Red: You assume the gas company shuts it off automatically. You have never touched your main water valve.
If you are Yellow or Red, execute Phase 1 immediately.
Phase 1: Natural Gas (The Fire Threat)
Goal: Prevent explosion.
1. The Golden Rule: Don’t Auto-Shutoff
- The myth: “Always turn off the gas after an earthquake.”
- The reality: NO. Only turn it off if you suspect a leak.
- The why: once you turn it off, it can take weeks for the utility company to get to you to turn it back on and relight pilots safely. If there is no leak, you want the heat/cooking ability.
2. The Detection Protocol
After the shaking stops, check these three signs:
- Smell: the “rotten egg” odor (mercaptan additive).
- Sound: a hissing noise near the meter or appliances.
- Sight: the dials on the meter spinning rapidly (even if appliances are off).
- Action: if any of these are present, gas is leaking, so shut it off.
3. The Shutdown Procedure
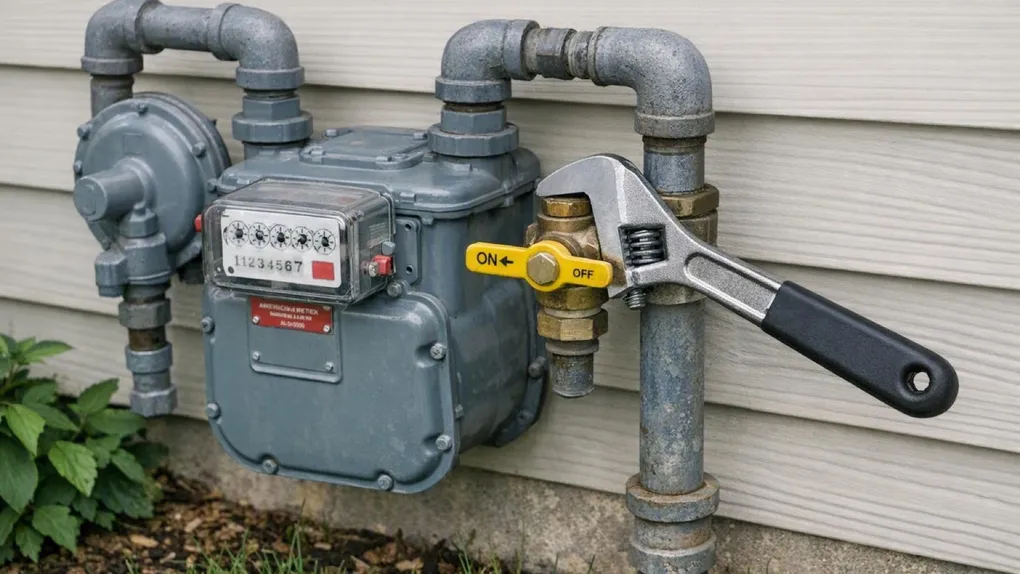
- The location: find your gas meter (usually outside on the side of the house).
- The valve: look for the rectangular tab on the pipe coming out of the ground. It runs parallel to the pipe when “ON.”
- The turn: use a wrench to turn the tab 90 degrees so it is perpendicular (crosswise) to the pipe. It is now “OFF.”
- The restoration: never turn the gas back on yourself. Wait for the utility company.
The Takeaway: Gas off only on evidence (smell, hiss, spinning dials), tab turned a quarter-turn crosswise, and the utility company owns the turn-back-on.
Phase 2: Water (The Flood & Thirst Threat)
Goal: Stop flooding and trap potable water.
1. The Double Benefit
Shutting off the water main does two things:
- Prevents flooding: stops water from pouring out of broken pipes inside your walls.
- Traps survival water: gravity pulls water out of your home if the street mains break. By closing your valve, you trap 30-50 gallons of clean water inside your pipes and water heater.
2. The Shutdown Procedure
- The location: usually on the street side of the house (often a hose bib) or in a box near the sidewalk.
- The valve:
- Ball valve: a lever handle. Turn it until it is perpendicular to the pipe.
- Gate valve: a round wheel handle. Turn it “righty-tighty” until it stops. Warning: old gate valves often break. Test yours gently today.
The Takeaway: One valve, two prizes: it stops the flood and banks 30 to 50 gallons of drinking water in the heater and pipes.
Phase 3: Electricity (The Ignition Source)
Goal: Eliminate sparks.
1. When to Cut Power
- If you smell gas.
- If you see sparks, smoke, or frayed wires.
- If there is standing water in the house.
2. The Shutdown Procedure
- The location: the breaker panel (garage, basement, or hallway).
- The method: flip the large “MAIN” breaker at the top of the panel to “OFF.”
- Note: you will need a flashlight (headlamp from your under-bed kit) to do this safely.
The Takeaway: The main breaker is the spark-eliminator, and it takes one flip, but only flip it for gas smell, sparks, or standing water.
The Essential Kit Checklist
- The gas tool: a non-sparking wrench zip-tied directly to the gas meter.
- The water tool: the valve handle location known, plus a valve key if yours is in a sidewalk box.
- The light: a headlamp hanging at the breaker panel.
- The labels: bright tags on gas, water, and main breaker so anyone in the family can find them.
Scenario Planner (Contingencies)
“The valve is rusted and won’t budge.” The trap: wrestling it mid-crisis and finding out now. The fix: the gentle test, try your gas and water valves today with light pressure. If they are seized, work them loose with penetrating oil, or replace the valve, because a kill switch that does not switch is decoration.
“I turned off the gas as a precaution and now it’s cold.” The trap: auto-shutoff against the golden rule. The fix: the lesson, next shaker, verify with your nose and ears before touching anything. For now, do not attempt relight: layer up, and log the wait as the cost of the shortcut.
Next Steps
- Zip-tie the non-sparking wrench to the gas meter today. The tool that lives elsewhere is the tool you will not have.
- Gently test both the gas and water valves this weekend, because seized valves are discovered on the worst possible day.
- Read Part 5: The anchor point next, where the threat moves from the stuff inside the house to the connection between the house and the earth itself.
Originally adapted from public FEMA, USGS, and utility-company earthquake guidance (public domain).